
- Business
- Marketing
- Social Media Marketing
- Editing Your Facebook Business Page
You can edit your Facebook business Page in many ways. Here, you see where you can add applications (apps), change the information people see about your Page, change your Profile image, and do many other things.
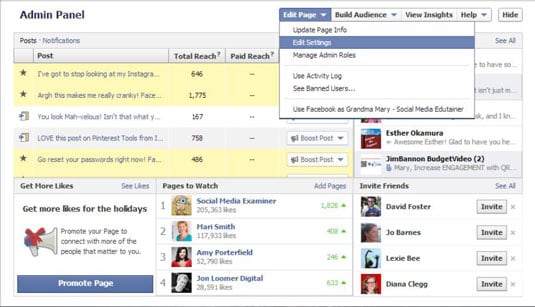
Click the Edit Page button at the top of your Admin panel.
You can click Update Page Info, Edit Settings, or Manage Admin Roles. It doesn’t matter, because clicking any of these will put you on your Page’s editing dashboard. You’ll be able to choose the item you want from the top menu.
You’re looking at your business Page’s administrative dashboard. This dashboard is where you edit and modify your Page. Notice the nice collection of navigation links across the top.
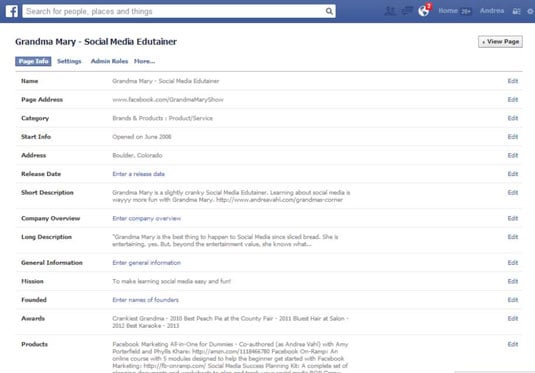
Remember all that work you did to figure out the type and category you wanted when you created your Page? Remember the Info editing? Well, if not, that’s okay. You can edit everything on your Page’s Info tab by clicking the Update Page Info link on your administrative dashboard. Each section can be edited by clicking the Edit link on the right side of the name of the field.
The fields you find on the Page About tab are specific to the category and Page type you selected when creating your Page. You can change the category and Page type for your Page by choosing new settings from the drop-down menus.
The first drop-down menu allows you to choose a new category for your Page; the second drop-down menu allows you to choose a new Page type. Make sure that you click Save Changes before editing the fields, because those fields might change with the category change.
Fill in all the fields, remembering that you don’t have to stick to what the fields are asking for. The Founded field, for example, allows you to have up to 260 characters, but you don’t have to use that many.
You can also add your Twitter username, website address, LinkedIn profile page, and any number of other things. If you include a web address, make sure to include http:// so that the address will be hyperlinked.
When you create your Page, the URL is long and unwieldy because it contains your Page’s ID number. It looks something like this:
http://www.facebook.com/pages/The-Social-Classroom-with-Phyllis-Khare/123451234512345
What you want is a vanity URL (or pretty URL). Facebook also calls it a “username.” You want it to look like this:
http://facebook.com/TheSocialClassroom
When you set up your business Page, or when you’ve reached the requested 25 likes on your Page, navigate to the Basic Information tab from your administrative dashboard, or go directly to the Username page.
You can use the Username page to set your Profile username, too. Make sure that you don’t set your business Page name to your personal name! Notice the username page has two sections: one for your personal name and one for your Pages. Your best bet is to set your personal account to your name and then set your Page URL.
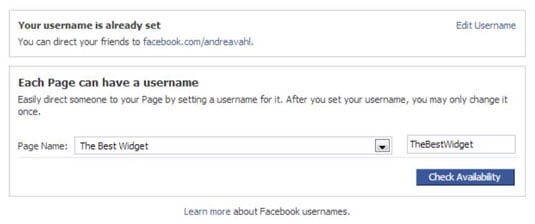
Click the Check Availability button to check available usernames. A Username Available box comes up, displaying several things to keep in mind about a username, such as making sure that you have the right to use the name you’ve selected.
When you have something that you like, and it’s available, click Confirm. Now you have a nice, neat URL for your Facebook Page. You can use this URL on everything, including letterhead, websites, and e-mail signatures. In the meantime, put this URL in your next e-mail to your customers so that they can find you easily on Facebook.